本日はチュートリアルの実施枠です。
Academyの「MR and Azure 302: Computer vision」の実施内容をまとめます。
docs.microsoft.com
前回記事の続きです。
bluebirdofoz.hatenablog.com
今回は「Chapter 6」です。
Chapter 6:Create the ImageCapture class
2番目に作成するスクリプトは ImageCapture クラスです。
このクラスは以下を担当します。
・HoloLens カメラを使用して画像をキャプチャし、App フォルダに保存します。
・ユーザーのタップジェスチャーをキャプチャします。
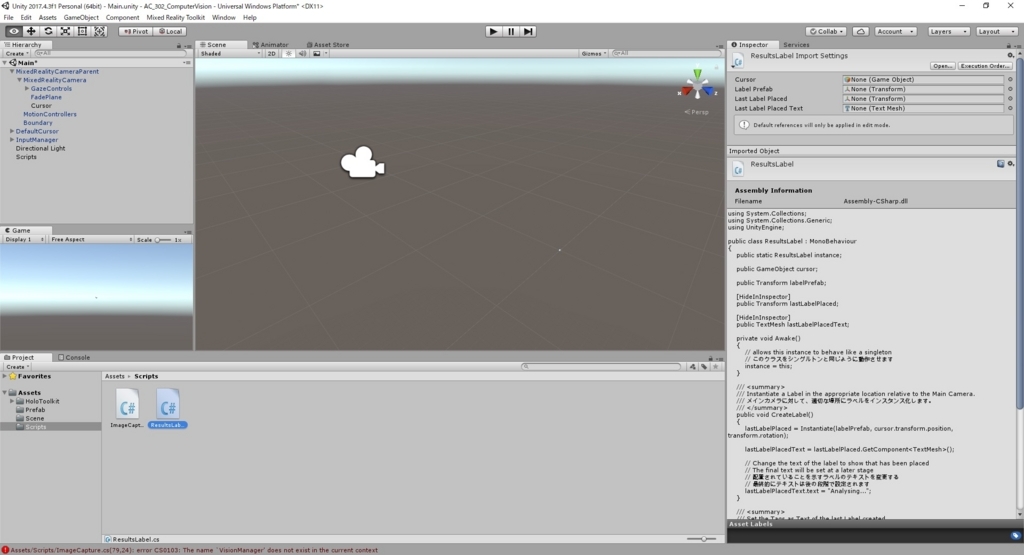
1.Script フォルダを開きます。
2.フォルダ内で右クリックして、Creapte -> C# Script を選択します。
Script の名称は ImageCapture に設定します。

3.新しいスクリプトをダブルクリックしてVisual Studioで開きます。
4-9.以下の通り、スクリプトを編集します。
・ImageCapture.cs
// 名前空間の追加
using System.IO;
using System.Linq;
using UnityEngine;
using UnityEngine.XR.WSA.Input;
using UnityEngine.XR.WSA.WebCam;

public class ImageCapture : MonoBehaviour {
    // メンバ変数の追加
    public static ImageCapture instance;
    public int tapsCount;
    private PhotoCapture photoCaptureObject = null;
    private GestureRecognizer recognizer;
    private bool currentlyCapturing = false;

    private void Awake()
    {
        // Allows this instance to behave like a singleton
        // このクラスをシングルトンと同じように動作させます
        instance = this;
    }

    void Start()
    {
        // subscribing to the Hololens API gesture recognizer to track user gestures
        // ユーザーのジェスチャーを追跡するために Hololens API ジェスチャー認識プログラムに登録する
        recognizer = new GestureRecognizer();
        recognizer.SetRecognizableGestures(GestureSettings.Tap);
        recognizer.Tapped += TapHandler;
        recognizer.StartCapturingGestures();
    }

    /// <summary>
    /// Respond to Tap Input.
    /// タップ入力の応答処理
    /// </summary>
    private void TapHandler(TappedEventArgs obj)
    {
        // Only allow capturing, if not currently processing a request.
        // 要求を処理中でない場合のみ、キャプチャを許可します。
        if (currentlyCapturing == false)
        {
            currentlyCapturing = true;

            // increment taps count, used to name images when saving
            // タップカウントを加算します。
            // 保存時にイメージに名前を付けるために使用します。
            tapsCount++;

            // Create a label in world space using the ResultsLabel class
            // ResultsLabelクラスを使用してワールド空間にラベルを作成する
            ResultsLabel.instance.CreateLabel();

            // Begins the image capture and analysis procedure
            // 画像の取り込みと分析の処理を開始します。
            ExecuteImageCaptureAndAnalysis();
        }
    }

    /// <summary>
    /// Register the full execution of the Photo Capture. If successful, it will begin
    /// the Image Analysis process.
    /// フォトキャプチャの実行を登録します。成功すると、画像解析プロセスが開始されます。
    /// </summary>
    void OnCapturedPhotoToDisk(PhotoCapture.PhotoCaptureResult result)
    {
        // Call StopPhotoMode once the image has successfully captured
        // キャプチャが正常に取得されたら StopPhotoMode を呼び出します。
        photoCaptureObject.StopPhotoModeAsync(OnStoppedPhotoMode);
    }

    void OnStoppedPhotoMode(PhotoCapture.PhotoCaptureResult result)
    {
        // Dispose from the object in memory and request the image analysis
        // to the VisionManager class
        // メモリ内のオブジェクトから破棄し、VisionManager クラスに画像解析を要求する
        photoCaptureObject.Dispose();
        photoCaptureObject = null;
        StartCoroutine(VisionManager.instance.AnalyseLastImageCaptured());
    }

    /// <summary>
    /// Begin process of Image Capturing and send To Azure
    /// Computer Vision service.
    /// 画像キャプチャのプロセスを開始し、Azure Computer Visionサービスに送信します。
    /// </summary>
    private void ExecuteImageCaptureAndAnalysis()
    {
        // Set the camera resolution to be the highest possible
        // カメラの解像度を可能な限り高く設定する
        Resolution cameraResolution = PhotoCapture.SupportedResolutions.OrderByDescending((res) => res.width * res.height).First();

        Texture2D targetTexture = new Texture2D(cameraResolution.width, cameraResolution.height);

        // Begin capture process, set the image format
        // キャプチャプロセスを開始し、イメージフォーマットの設定を行う。
        PhotoCapture.CreateAsync(false, delegate (PhotoCapture captureObject)
        {
            photoCaptureObject = captureObject;
            CameraParameters camParameters = new CameraParameters();
            camParameters.hologramOpacity = 0.0f;
            camParameters.cameraResolutionWidth = targetTexture.width;
            camParameters.cameraResolutionHeight = targetTexture.height;
            camParameters.pixelFormat = CapturePixelFormat.BGRA32;

            // Capture the image from the camera and save it in the App internal folder
            // カメラから画像をキャプチャして、それをAppの内部フォルダに保存します。
            captureObject.StartPhotoModeAsync(camParameters, delegate (PhotoCapture.PhotoCaptureResult result)
            {
                string filename = string.Format(@"CapturedImage{0}.jpg", tapsCount);

                string filePath = Path.Combine(Application.persistentDataPath, filename);

                VisionManager.instance.imagePath = filePath;

                photoCaptureObject.TakePhotoAsync(filePath, PhotoCaptureFileOutputFormat.JPG, OnCapturedPhotoToDisk);

                currentlyCapturing = false;
            });
        });
    }
}
※ この時点で、Unity Editor Consoleパネルにエラーが表示されます(「The name ‘VisionManager’ does not exist...」)。
これは、コードが VisionManager クラスを参照するためです。VisionManager クラスは、次の章で作成します

10.Visual Studio で変更を保存して Unity に戻ります。

Chapter 6 はここまでです。
次回は Chapter 7 を実施します。
bluebirdofoz.hatenablog.com