本日はチュートリアルの実施枠です。
Academyの「MR and Azure 301: Language translation」の実施内容をまとめます。
docs.microsoft.com
前回記事の続きです。
bluebirdofoz.hatenablog.com
今回は「Chapter 6」です。
Chapter 6:Create the MicrophoneManager class
2つ目に作成するスクリプトは MicrophoneManager クラスです。
このクラスは以下を担当します。
・ヘッドセットまたはマシンに接続されている録音デバイスを検出します(デフォルトのいずれか)
・オーディオ(音声)をキャプチャし、ディクテーションを使用して文字列として保存します
・音声が一時停止したら、口述を Translator クラスに提出します
・必要に応じて音声キャプチャを停止できる方法をホストします
1.Script フォルダを開きます。
2.フォルダ内で右クリックして、Creapte -> C# Script を選択します。
Script の名称は MicrophoneManager に設定します。

3.新しいスクリプトをダブルクリックしてVisual Studioで開きます。
4-9.以下の通り、スクリプトを編集します。
・MicrophoneManager.cs
using System.Collections;
using System.Collections.Generic;
using UnityEngine;
// 名前空間の追加
using UnityEngine;
using UnityEngine.Windows.Speech;

public class MicrophoneManager : MonoBehaviour {
    // Help to access instance of this object
    // このオブジェクトのインスタンスにアクセスするための変数
    public static MicrophoneManager instance;

    // AudioSource component, provides access to mic
    // マイクへのアクセスを提供するAudioSourceコンポーネント
    private AudioSource audioSource;

    // Flag indicating mic detection
    // マイク検出を示すフラグ
    private bool microphoneDetected;

    // Component converting speech to text
    // 音声をテキストに変換するコンポーネント
    private DictationRecognizer dictationRecognizer;

    // 初期化処理の追加
    private void Awake()
    {
        // Set this class to behave similar to singleton
        // このクラスをシングルトンと同じように動作させます
        instance = this;
    }

    // 初期化処理の追加(StartはAwakeの後に実行)
    void Start()
    {
        //Use Unity Microphone class to detect devices and setup AudioSource
        // Unity Microphoneクラスを使用してデバイスを検出し、AudioSourceを設定する
        if (Microphone.devices.Length > 0)
        {
            Results.instance.SetMicrophoneStatus("Initialising...");
            audioSource = GetComponent<AudioSource>();
            microphoneDetected = true;
        }
        else
        {
            Results.instance.SetMicrophoneStatus("No Microphone detected");
        }
    }

    // アプリケーションが音声キャプチャの開始と停止に使用するメソッドの追加
    /// <summary>
    /// Start microphone capture. Debugging message is delivered to the Results class.
    /// マイクキャプチャを開始します。デバッグメッセージはResultsクラスに配信されます。
    /// </summary>
    public void StartCapturingAudio()
    {
        if (microphoneDetected)
        {
            // Start dictation
            // ディクテーションの開始
            dictationRecognizer = new DictationRecognizer();
            dictationRecognizer.DictationResult += DictationRecognizer_DictationResult;
            dictationRecognizer.Start();

            // Update UI with mic status
            // UIのマイクステータスを更新する
            Results.instance.SetMicrophoneStatus("Capturing...");
        }
    }

    /// <summary>
    /// Stop microphone capture. Debugging message is delivered to the Results class.
    /// マイクのキャプチャを停止します。デバッグメッセージはResultsクラスに配信されます。
    /// </summary>
    public void StopCapturingAudio()
    {
        Results.instance.SetMicrophoneStatus("Mic sleeping");
        Microphone.End(null);
        dictationRecognizer.DictationResult -= DictationRecognizer_DictationResult;
        dictationRecognizer.Dispose();
    }

    //音声が停止したときに呼び出されるDictation Handlerの追加
    /// <summary>
    /// This handler is called every time the Dictation detects a pause in the speech.
    /// Debugging message is delivered to the Results class.
    /// ディクテーションが音声のポーズを検出するたびにこのハンドラが呼び出されます。
    /// デバッグメッセージはResultsクラスに配信されます。
    /// </summary>
    private void DictationRecognizer_DictationResult(string text, ConfidenceLevel confidence)
    {
        // Update UI with dictation captured
        // ディクテーションをキャプチャしてUIを更新
        Results.instance.SetDictationResult(text);

        // Start the coroutine that process the dictation through Azure
        // Azureを通してディクテーションを処理するコルーチンを開始する
        StartCoroutine(Translator.instance.TranslateWithUnityNetworking(text));
    }
}
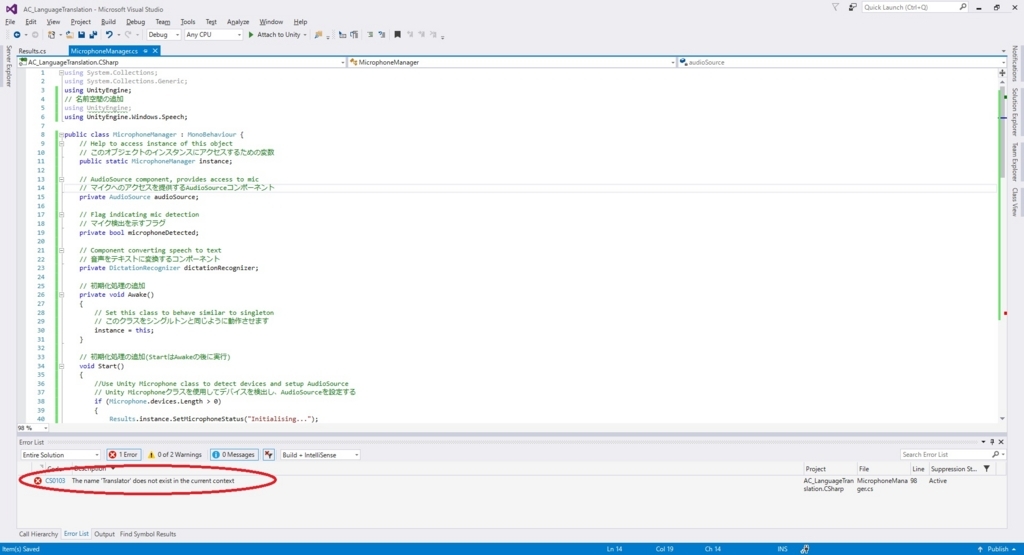
※ この時点でエラーが表示されます(「The name ‘Translator’ does not exist...」)。
これは、コードが Translator クラスを参照するためです。Translator クラスは、次の章で作成します

10.Visual Studio で変更を保存して Unity に戻ります。

Chapter 6 はここまでです。
次回は Chapter 7 を実施します。
bluebirdofoz.hatenablog.com