本日は Blender2.8 の調査枠です。
Blender 2.8 の Python API ドキュメントを少しずつ読みつつ試していきます。
Blender 2.8 Python API Documentation
以下のページを日本語訳しつつ実際に試しつつ記事を進めていきます。
docs.blender.org
docs.blender.org
今日は「クイックスタート」の Blender への統合に関してです。

Blender への統合
Python スクリプトは、次の方法で Blender と統合できます。
・レンダリングエンジンを定義する。
・オペレーターを定義する
・メニュー、ヘッダー、パネルを定義する
・既存のメニュー、ヘッダー、パネルに新しいボタンを挿入する
これは既存の型のサブクラスであるクラスを定義することによって行われます。
オペレーターの例
import bpy

# メイン関数
# シーン内のオブジェクトを print 出力する
def main(context):
    for ob in context.scene.objects:
        print(ob)

# SimpleOperatorクラスの作成
class SimpleOperator(bpy.types.Operator):
    """Tooltip"""
    bl_idname = "object.simple_operator"
    bl_label = "Simple Object Operator"

# poll関数の定義
    @classmethod
    def poll(cls, context):
        return context.active_object is not None

# 実行処理の定義
    def execute(self, context):
        main(context)
        return {'FINISHED'}

# SimpleOperatorの登録
def register():
    bpy.utils.register_class(SimpleOperator)

# SimpleOperatorの解除
def unregister():
    bpy.utils.unregister_class(SimpleOperator)

# 実行例:[SimpleOperatorの登録]を実施
if __name__ == "__main__":
    register()

    # test call
    bpy.ops.object.simple_operator()
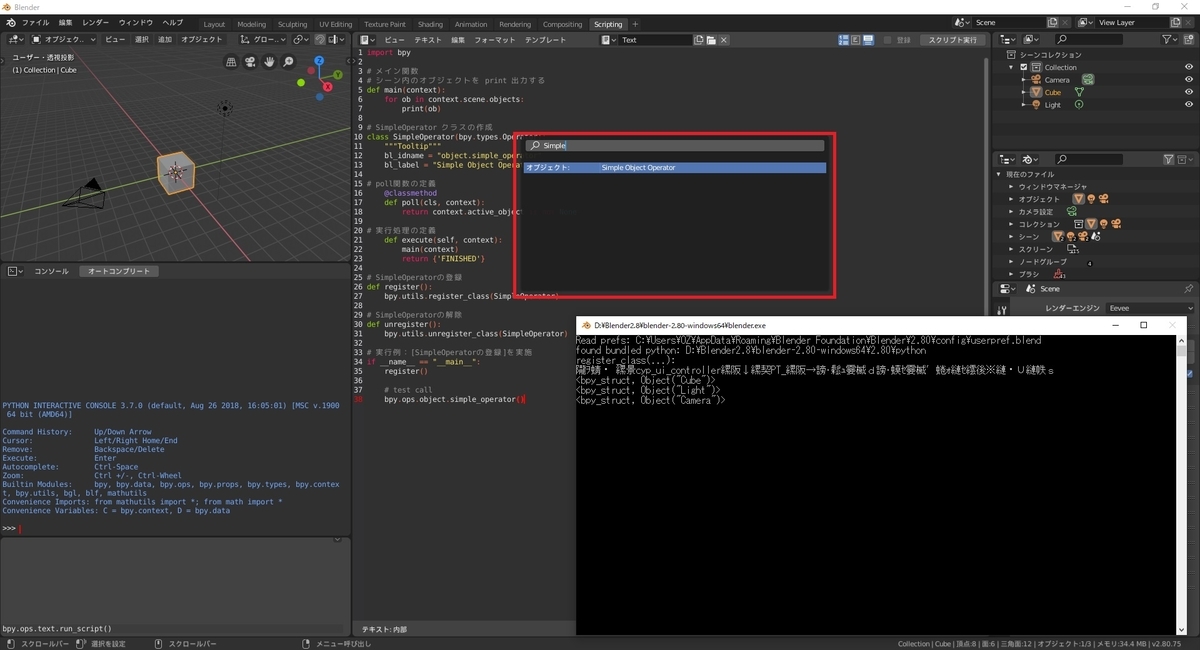
このスクリプトが実行されると、[SimpleOperator]が Blender に登録されます。
オペレータ検索ポップアップから呼び出すか、ツールバーに追加できます。
スクリプトを実行するには:
1.上記のコードを Ctrl+C キーでコピーします。
2.Blenderを起動します
3.[Script]レイアウトを開きます。
4.[New]ボタンをクリックすると、新しいテキストブロックが作成されます。
5.Ctrl+V キーを押して、コードをテキストパネルに貼り付けます。
6.[スクリプトの実行]ボタンをクリックします。
7.カーソルを[3Dビュー]に移動し、オペレーター検索メニュー(F3キー)を開いて「Simple」と入力します。
8.検索で見つかった「Simple Operator」アイテムをクリックします。

main 関数からの出力は端末に送信されます。
これを確認するにはメニューから ウィンドウ -> システムコンソール切替え でターミナルを表示してください。

サンプルパネル
パネルは、演算子のようなクラスとして自分自身を登録します。
[bl_]表示されるコンテキストの設定に使用される追加の変数に注意してください。
import bpy

# HelloWorldPanelクラスの作成
class HelloWorldPanel(bpy.types.Panel):
    """Creates a Panel in the Object properties window"""
    bl_label = "Hello World Panel"
    bl_idname = "OBJECT_PT_hello"
    bl_space_type = 'PROPERTIES'
    bl_region_type = 'WINDOW'
    bl_context = "object"

# 描画の定義
    def draw(self, context):
        layout = self.layout

        obj = context.object

        row = layout.row()
        row.label(text="Hello world!", icon='WORLD_DATA')

        row = layout.row()
        row.label(text="Active object is: " + obj.name)
        row = layout.row()
        row.prop(obj, "name")

        row = layout.row()
        row.operator("mesh.primitive_cube_add")

# HelloWorldPanelの登録
def register():
    bpy.utils.register_class(HelloWorldPanel)

# HelloWorldPanelの解除
def unregister():
    bpy.utils.unregister_class(HelloWorldPanel)

# 実行例:[HelloWorldPanelの登録]を実施
if __name__ == "__main__":
    register()
スクリプトを実行するには:
1.上記のコードを Ctrl+C キーでコピーします。
2.Blenderを起動します
3.[Script]レイアウトを開きます。
4.[New]ボタンをクリックすると、新しいテキストブロックが作成されます。
5.Ctrl+V キーを押して、コードをテキストパネルに貼り付けます。
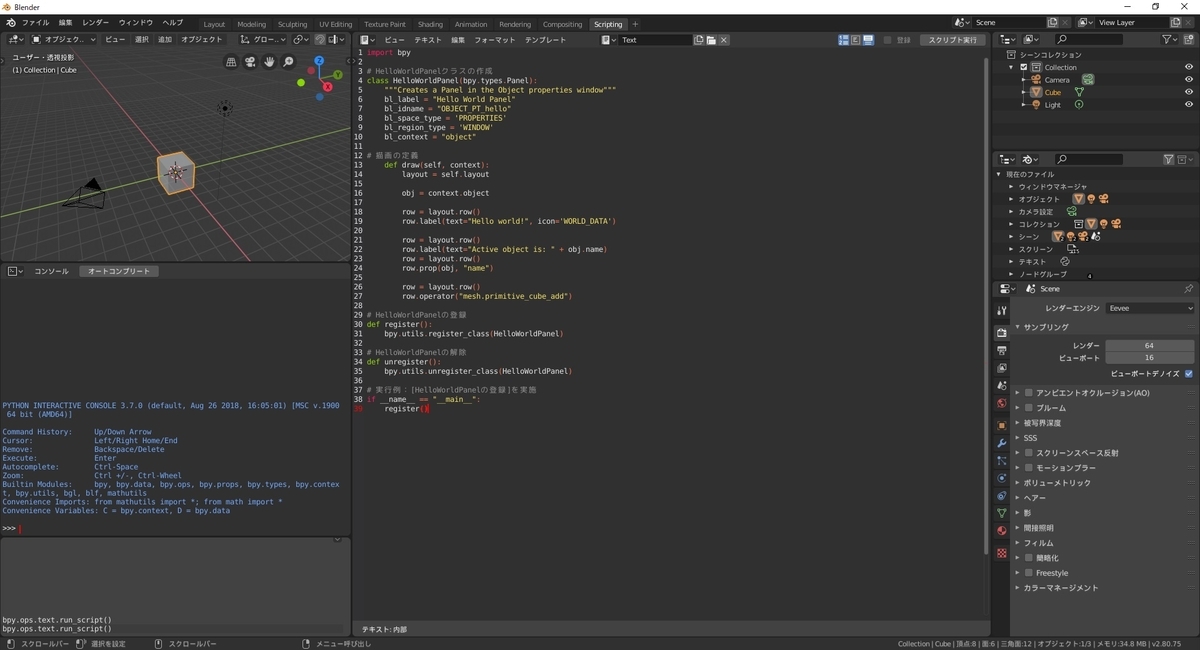
6.[スクリプトの実行]ボタンをクリックします。

結果を表示するには:
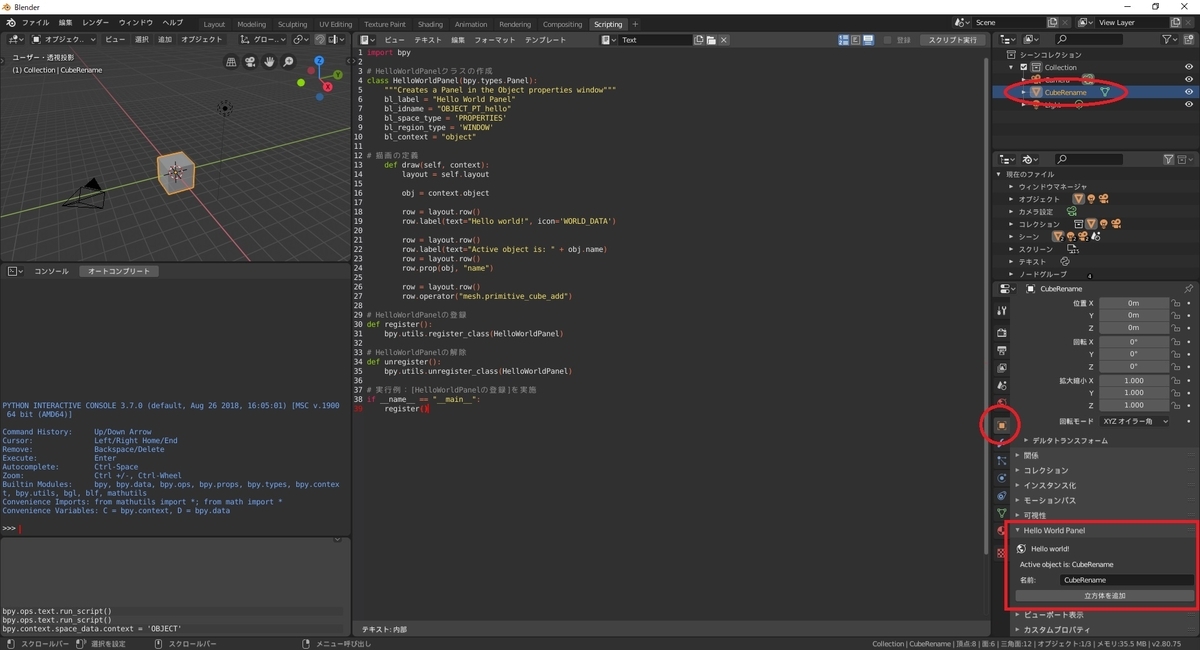
1.デフォルトの"Cube"オブジェクトを選択します。
2.プロパティの[オブジェクトプロパティ]アイコンをクリックします(右端、小さな立方体として表示されます)。
3.下にスクロールして、Hello World Panelという名前のパネルを表示します。
4.オブジェクト名を変更すると、Hello Worldパネルの Name:フィールドも更新されます。

行の分布と、コードで利用可能なラベルとプロパティに注意してください。
docs.blender.org