本日は Unity の技術調査枠です。
Unity Test FrameworkのPlay Modeを使って再生モード上のテストを作成して実行する手順を記事にします。

前回記事
以下の記事の続きです。
UnityTestFramework についてや基本的なテストの作成手順の詳細についてはこちらを参照ください。
bluebirdofoz.hatenablog.com
PlayMode
Unity Test の Play Mode ではプロジェクトを再生した状態でのテストが実施できます。
Play Mode ではコルーチンを使ったテストを記述することで、フレームが経過する試験を記述できます。
docs.unity3d.com
サンプルプロジェクト
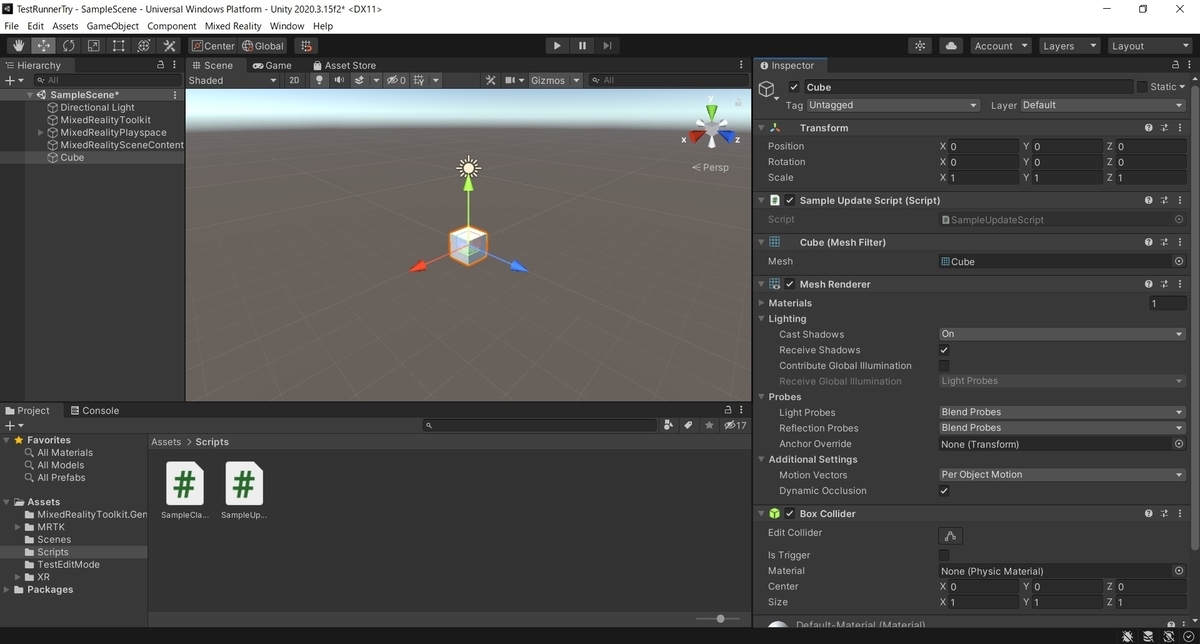
試験を行う Unity プロジェクトを作成します。

試験対象のスクリプトとして、以下のフレーム毎に移動する関数を持ったスクリプトを作成しました。
・SampleUpdateScript.cs
using System.Collections;
using System.Collections.Generic;
using UnityEngine;

public class SampleUpdateScript : MonoBehaviour
{
    /// <summary>
    /// 経過時間の保持
    /// </summary>
    private float timeElapsed;

    /// <summary>
    /// 移動先座標
    /// </summary>
    private Vector3 toPosition;

    void Start()
    {
    }

    void Update()
    {
        if (this.transform.position != toPosition)
        {
            // 徐々に移動先へと向かう
            timeElapsed += Time.deltaTime / 100.0f;
            this.transform.position = Vector3.Lerp(this.transform.position, toPosition, timeElapsed);
        }
    }

    /// <summary>
    /// 移動先座標を設定して移動開始する
    /// </summary>
    public void MoveToPosition(Vector3 a_ToPosition)
    {
        timeElapsed = 0.0f;
        toPosition = a_ToPosition;
    }
}

PlayModeのテストを作成する
初めに Play Mode で動作するテストスクリプトを作成して実行してみます。
テストスクリプトの作成
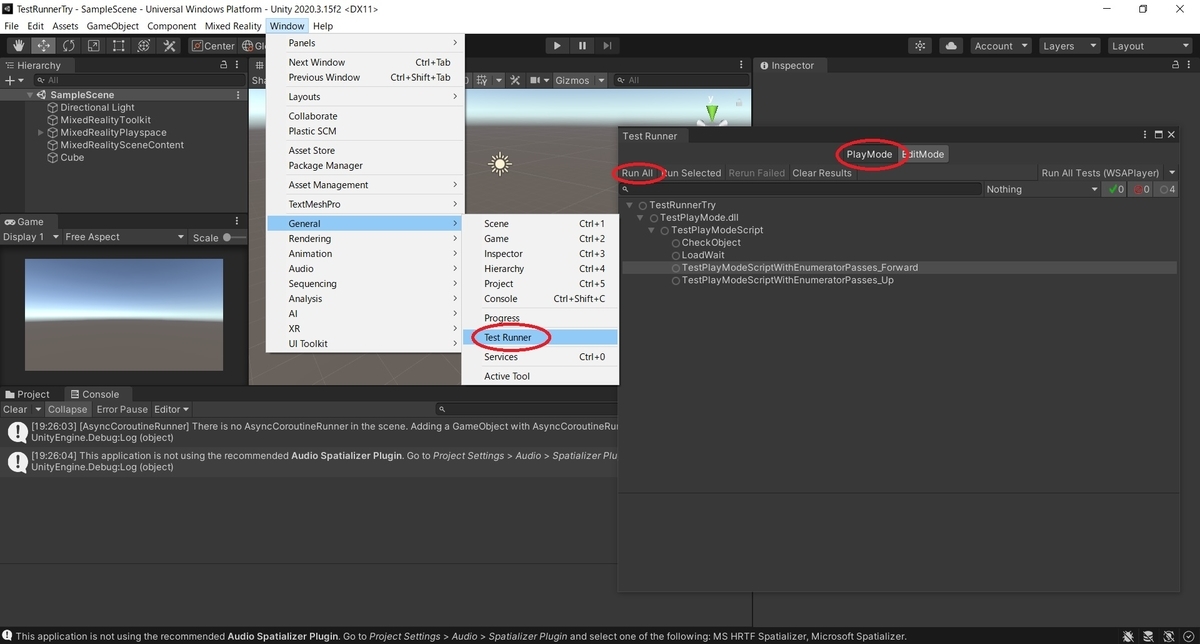
メニューから[Window -> General -> TestRunner]で[Test Runner]ダイアログを開きます。
Edit Mode の時と同様に[Play Mode]タブからボタンをクリックして作成します。

Edit Mode の時と同様に[Test Runner]ダイアログに現在作成中の Play Mode のテストスクリプトが追加されます。

テスト対象への参照を追加
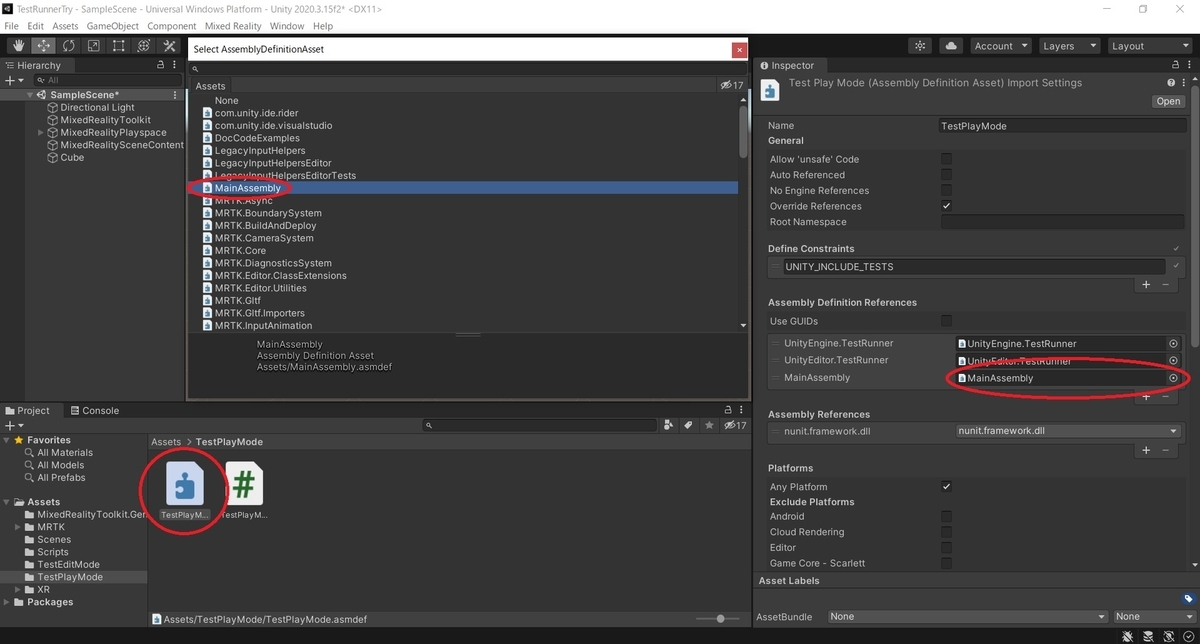
Play Mode でもアセンブリにテスト対象への参照を追加する必要があります。
テストスクリプトのアセンブリを開き、[Assembly Definition References]の項目にアセンブリの参照を追加します。

シーンの参照を追加
メニューから[File -> Build Settings]を開き、[Add Open Scenes]でテスト対象のシーンを[Scenes In Build]に追加します。
これは後述のテストスクリプトで SceneManager を使ってシーンにアクセスするためです。

テストスクリプトの編集
テストスクリプトを編集して対象のシーンをテストするコードを記述します。
Unity Test Framework では NUnit の属性を利用することで詳細な実行条件を設定することができます。
・TestPlayModeScript.cs
using System.Collections;
using System.Collections.Generic;
using NUnit.Framework;
using UnityEngine;
using UnityEngine.TestTools;

// SceneManager 参照のため
using UnityEngine.SceneManagement;

public class TestPlayModeScript
{
    /// <summary>
    /// シーンロード完了フラグ
    /// </summary>
    bool sceneLoading;

    /// <summary>
    /// テスト対象オブジェクトの参照
    /// </summary>
    GameObject testObject;

    /// <summary>
    /// テストスクリプトの参照
    /// </summary>
    SampleUpdateScript targetScript;

    // OneTimeSetUp:全テストを実行する前に一度だけ処理する
    [OneTimeSetUp]
    public void InitializeTest()
    {
        sceneLoading = true;
        SceneManager.LoadSceneAsync("SampleScene").completed += _ => {
            testObject = GameObject.Find("Cube");
            targetScript = testObject.GetComponent<SampleUpdateScript>();
            sceneLoading = false;
            Debug.Log("Scene Load Complete");
        };
    }

    // SetUp:各テストの前に毎回処理する
    [SetUp]
    public void InitializeAllTest()
    {
        if (testObject != null) testObject.transform.position = Vector3.zero;
    }

    // Order:優先度を指定して最初にロードの完了待ちを行う
    [UnityTest]
    [Order(-100)]
    public IEnumerator LoadWait()
    {
        yield return new WaitWhile(() => sceneLoading);
    }

    // オブジェクト参照エラーをチェックするテスト
    [UnityTest]
    public IEnumerator CheckObject()
    {
        Assert.NotNull(testObject);
        yield return null;
    }

    // 上方向への移動を実行するテスト
    [UnityTest]
    public IEnumerator TestPlayModeScriptWithEnumeratorPasses_Up()
    {
        Vector3 targetPosition = Vector3.up * 5.0f;
        targetScript.MoveToPosition(targetPosition);

        for (int loop = 0; loop < 10000; loop++)
        {
            // 指定座標に到達するか一定フレームが経過するまで待機する
            if (targetPosition == testObject.transform.position) break;
            yield return null;
        }

        // テスト結果をチェックする
        Assert.That(testObject.transform.position == targetPosition);
        yield return null;
    }

    // 正面方向への移動を実行するテスト
    [UnityTest]
    public IEnumerator TestPlayModeScriptWithEnumeratorPasses_Forward()
    {
        Vector3 targetPosition = Vector3.forward * 5.0f;
        targetScript.MoveToPosition(targetPosition);

        for (int loop = 0; loop < 10000; loop++)
        {
            // 指定座標に到達するか一定フレームが経過するまで待機する
            if (targetPosition == testObject.transform.position) break;
            yield return null;
        }

        // テスト結果をチェックする
        Assert.That(testObject.transform.position == targetPosition);
        yield return null;
    }
}

テストの実行
再び[Test Runnder]ダイアログを開き、[Run All]でテストを実行してみます。

シーンが再生され、全てのテストが実行されます。
スクリプトの処理により、オブジェクトが想定通りに動くことが確認できました。

